Reference design
Agent-run claim photo inspections: a ZenSched reference design
Westfield TPA emailed at 6:12. Wind hail, 1042 Oak Ave, inspection only $150. The claim number lives in your inbox. Marcus texted a camera-roll dump from the lot. When the desk adjuster asks whether anyone stood on the roof yesterday, you scroll photos. What if an AI assistant could take that pasted assignment, put a GPS check-in on the inspector’s phone at that loss address, collect a Claim Photo Report with overview and detail shots, and answer “did Marcus hit Oak Ave before noon” — without putting claimant names, claim numbers, or policy numbers into a vendor cloud, and without pretending to write the estimate or upload to XactAnalysis?
This reference design shows how a solo independent adjuster or photo-only inspector, or a 2–8 inspector shop dispatching 1099s, can deploy an AI agent using ZenSched as the live schedule of record (with a Claim Photo Report on the phone) and a local SQLite database for carriers, assignments, invoices, and sub payouts.
Honest framing: this is not Xactimate and not XactAnalysis
Read this before you clone the kit.
- ZenSched does not write estimates. No scope, no line items, no replacement-cost figure, no coverage decision. Xactimate still does that. This kit is the visit log and photo pack you keep — GPS at the pin, overview and detail photos, export for the desk.
- It does not upload to XactAnalysis, ClaimsConnect, or Symbility. Carrier assignments that arrived through XA are dispatch tickets only. You still return the file through whatever pipe the carrier requires. This is your copy when the assignment closes or the TPA disputes the visit.
- There is no BAA. Do not run health claims, medical records, workers’ comp health visits, or injury files here. Property and auto photo inspections only.
- Optional burned-in photo stamp (opt-in per field). Set
"stamp_photos": trueon compliance photo fields in the kit’sform_create/form_updatepayload. After upload, the server burns readable date, time, and GPS onto the JPEG from capture metadata (default off). Each image also storescapture_lat/capture_lng,capture_ts, andcapture_sourceon the record. Gallery picks without EXIF may stamp date/time only. The GPS check-in punch is separate — whether the inspector was inside the geofence. Not a substitute for XactAnalysis upload or carrier proof rules. - Claimant names, claim numbers, and policy numbers stay on your computer. Those fields live only in local SQLite. Location title is
Inspect A-2026-0001 - Oak Ave— assignment number plus street, never the insured’s name. The form header says so again. Damage photos do go to ZenSched — that is the report.
The kit’s SKILL.md makes that split a hard rule. Do not sell this as cheaper Xactimate, and do not say it replaces the carrier’s assignment system.
The problem: a camera roll and a disputed visit
Field inspectors already have a stack: XactAnalysis and Xactimate if they write estimates; Eberl360 or Pilot On Demand on that firm’s jobs; otherwise the assignment email, a camera roll, a Dropbox folder named for the street, and QuickBooks. When a TPA says the inspection did not happen — or a 1099 bills you for a site they skipped — the evidence is EXIF and a text.
The weekly loop is the same whether you drive the county yourself or dispatch six 1099s:
- Prove the visit happened at the loss address, when you say it did.
- Hand back a photo pack the desk can write from — exterior, roof, interior, close-ups.
- Know the 1099 actually went. “Did Marcus inspect Oak Ave yesterday” should be ten seconds.
- Get paid. Flat fees, photo overages, net-30 aging.
- Keep claim identifiers off someone else’s cloud. The street still has to geocode.
Not on that list: writing the estimate, uploading to XactAnalysis, or taking the carrier’s assignment.
The solution: split responsibility between ZenSched and local data
This architecture divides work cleanly:
- ZenSched: Live loss-site pin, GPS-verified check-in and check-out (geofence enforced), inspector app + push, one Claim Photo Report (loss type, access, overview photos, detail photos, weather, denied reason, notes). ZenSched never stores claimant names, claim numbers, policy numbers, or date of birth.
- Local SQLite database: Clients and terms, places cache, assignments (claim number / policy / claimant local only), visit cache, invoices, 1099 payouts. Links to ZenSched location, event, and shift IDs. After one metered form read, punches and photo URLs are cached so “export Oak Ave photos for the file” is free later.
The agent orchestrates both: it parses a pasted assignment into a local row, creates a single-day event titled Inspect A-2026-0001 - Oak Ave, and writes verified arrival plus the report back into SQLite for the export pack and invoice.
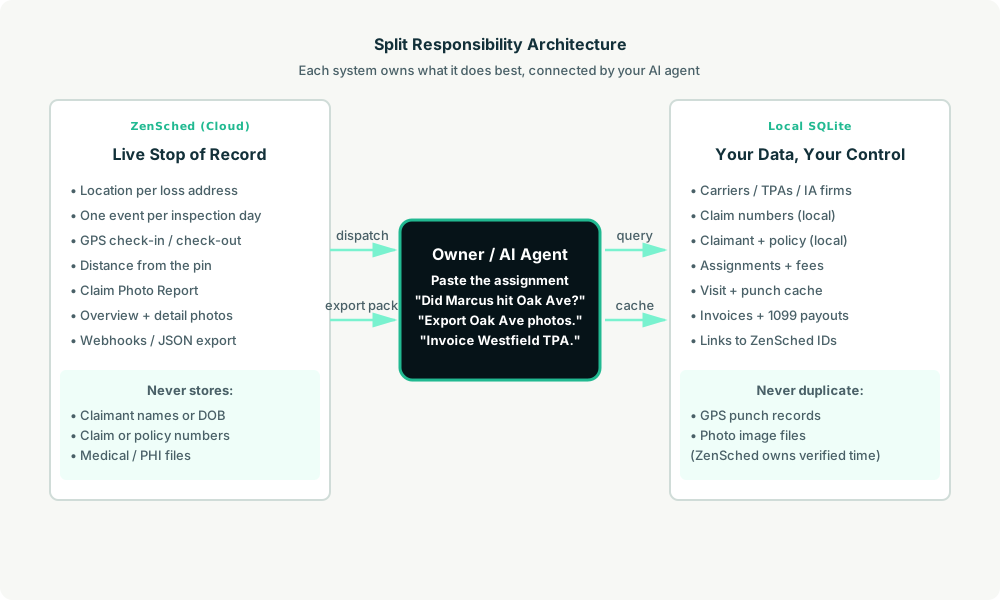
Privacy: claim numbers never cross
The loss address has to go to ZenSched so the geofence works. The event title is the assignment number plus the street — not a claimant name, not a policy number. Everything that identifies the claim file stays in local assignments. If you ask the agent to put a name or claim number in a ZenSched field — including cancellation reasons subs can see — it should refuse.
show_if follow-ups work on the phone: denied-access notes stay hidden until access is marked denied. There is no signature field (it replaces Submit on ZenSched). No web worker UI.
Day-to-day workflow
A typical inspection day looks like this:
- You to agent (plain English): Paste the TPA assignment. “Book Oak Ave wind for 2pm.”
- Agent writes SQLite: Upserts the client, keeps claim number and claimant name local, opens assignment
A-2026-0001. - Agent creates the window on ZenSched: One
location_createif the address is new, one single-day event titledInspect A-2026-0001 - Oak Ave,form_assignfor the Claim Photo Report, oneshift_create. The inspector gets a push. - The inspector does the work: Open the ZenSched app, GPS check-in at the loss site, shoot overview and detail photos, fill access and weather, check out. Then, if the carrier requires it, they still open XactAnalysis.
- Export pack: “Export Oak Ave photos for the file.” Agent pulls punches (free) and the report (metered once) — time, distance, photo URLs grouped exterior → detail.
- Money: “Invoice Westfield TPA for September.” “What do I owe Marcus?” Plain-text invoice under client terms; 1099 splits from verified visits.
No dashboards. No asking you to run SQL. Paste the assignment, then talk to the agent.
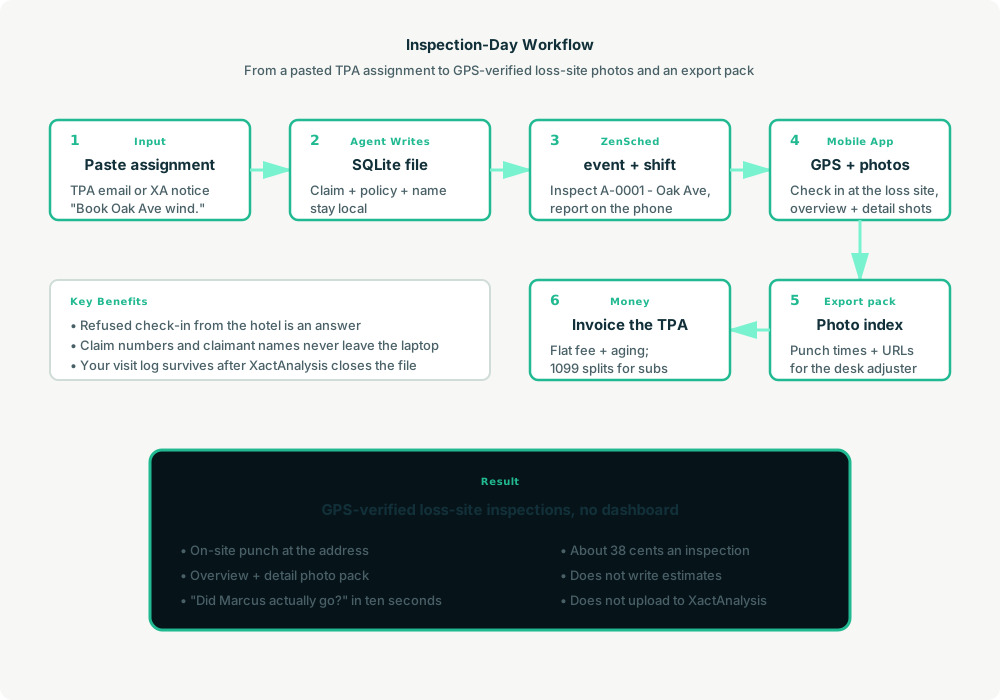
Claim Photo Report on the phone
Here’s what the report looks like on a real shift. The inspector opens the ZenSched mobile app (iOS App Store | Google Play), checks in at the loss site, then fills the form before they drive off.
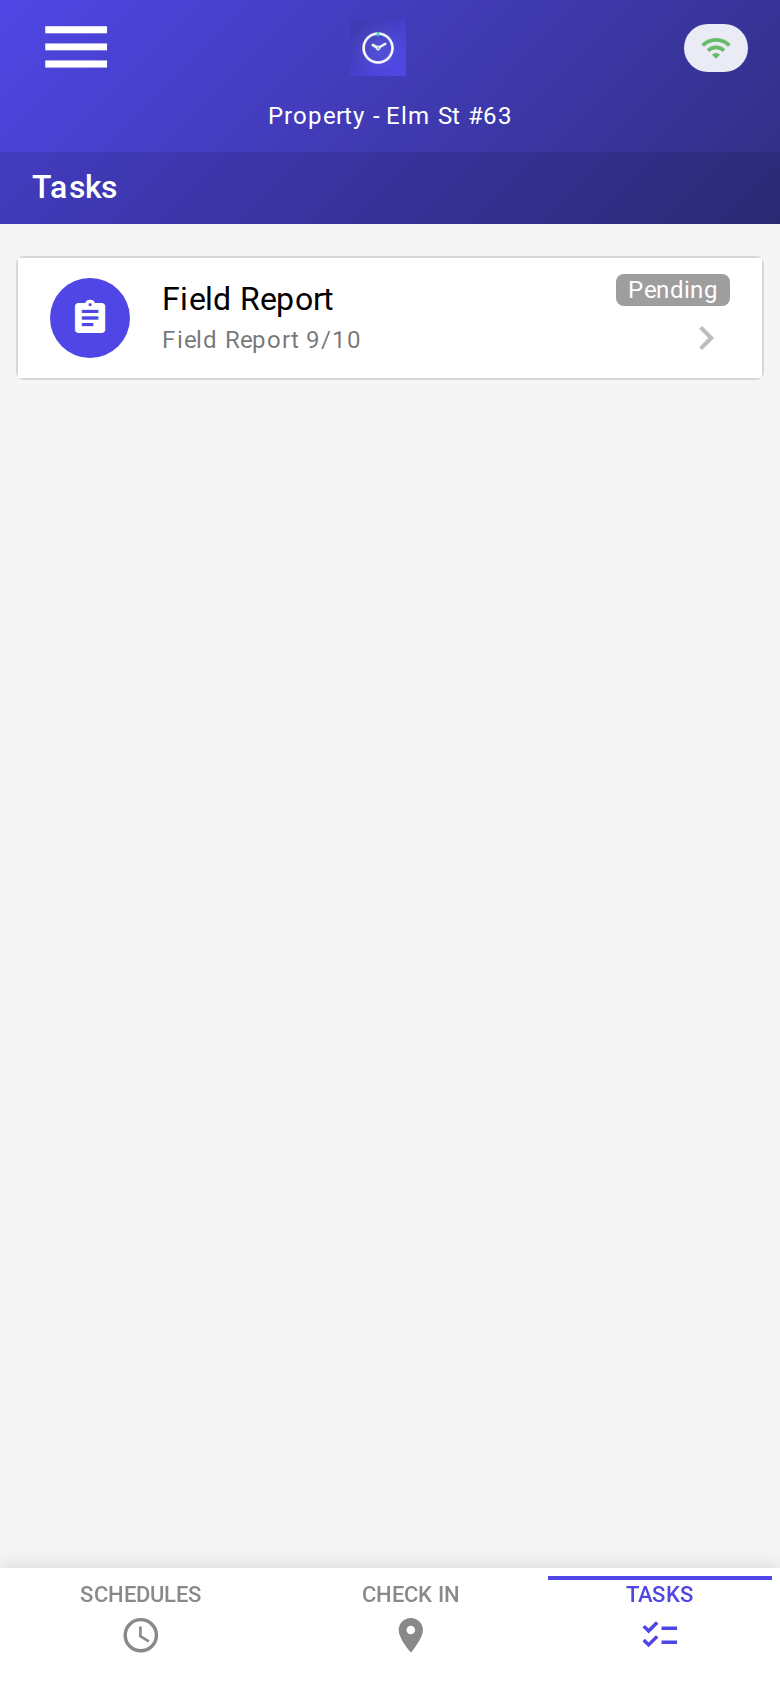
The Tasks tab with a pending Claim Photo Report. Check-in is GPS-verified at the loss address before the form is the work.
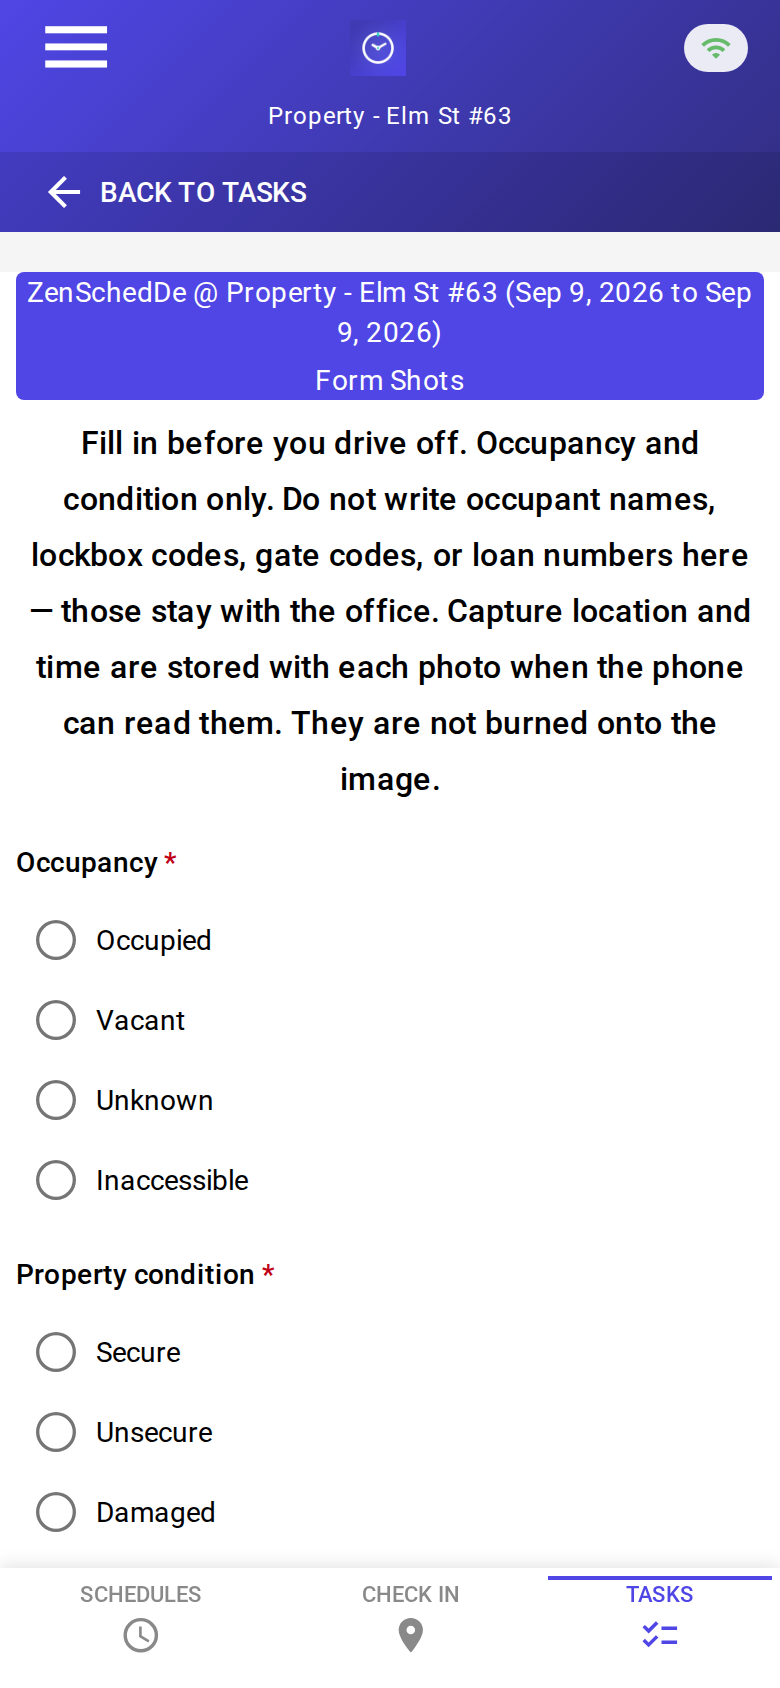
The blank report: loss type, access, overview and detail photos, weather. The header says not to write claimant names, claim numbers, or policy numbers. Compliance photo fields in the kit set "stamp_photos": true so exported JPEGs carry readable date, time, and GPS. No signature pad.

A completed inspection: hail damage documented, overview and detail photos attached. About 38 cents with GPS in, GPS out, and the photo read.
Setup summary
Getting started takes about 15 minutes:
- Install an MCP client: Claude Desktop, Cursor, or Muse Code.
- Connect ZenSched MCP: Add
https://mcp.zensched.com/mcpto your MCP config. Muse uses a different file shape — see the Muse snippet in the quickstart. - Connect easy-sqlite-mcp: Point
SQLITE_PATHat a localclaims-ops.dbon an encrypted, backed-up folder (this file holds claim numbers and claimant names — treat it like a claim file cabinet). - Paste the reference skill: The zensched-claims-inspection-kit includes
SKILL.md,schema.sql, and a quickstart. Load the schema once (one statement per execute). - Create your ZenSched account: Call
zensched_guide, thenaccount_createfor azsc_key (no email required). Invite yourself as a worker in solo mode — you are who checks in. 1099s get their own invite. - Fund when needed: Free tools under daily quota; metered GPS, geocode, worker invites, and form reads draw from prepaid balance. The $5 activation deposit is credited to your account.
Rural CAT sites and bad geocodes need a second brand and policy with a wider radius (150–250 m). Do not flip remote_checkin on the default org-wide policy — that turns GPS proof off for every metro stop too.
Worker app: Android on Google Play and iOS on the App Store.
For step-by-step details, see the ZenSched quickstart and the claims-inspection kit.
Metering: what you pay for
ZenSched uses transparent per-action pricing (see pricing):
- Free MCP calls under daily quota for basic operations
- GPS check-in/check-out: $0.10 each (metered verification)
- Address geocoding: $0.03 per new loss address (once; a repeat property reuses the pin)
- Worker invite: $0.25 per inspector (once), including yourself
- Form submission reads: $0.05 basic / $0.15 with photos — read once, cache locally. The photo meter is per submission, not per image. Overview and detail photos are required, so plan on $0.15.
Worked example from the vertical pitch: about $0.38 an inspection (GPS in + GPS out + Claim Photo Report + a new-address geocode). Forty inspections a month is $15.20. A repeat address drops the geocode and lands near $0.35. GPS-only — they already shot the carrier set — is $0.23. On a $150 inspection that is 0.25%.
Read the incumbent comparison honestly. ZenSched is not cheaper than Xactimate because it is not Xactimate — they still buy Verisk for estimating. Eberl360 and Pilot On Demand are free to the 1099 on their jobs. Encircle Field Doc at $285/month is a restorer tool, not an IA visit log. Price is not the sell. Sell enforced GPS the owner can query in English, a photo pack you own after XA closes the file, and contractor enforcement on Saturday TPA jobs that never entered a network app.
What you get
- Geofenced check-in and check-out at the loss address, with distance from the pin
- A Claim Photo Report on the phone: loss type, access, overview + detail photos, weather
- “Did Marcus actually go to Oak Ave?” from the agent in ten seconds
- An export pack with punch times and photo URLs for the desk adjuster
- Invoices and 1099 payouts on the laptop from verified visits
- About 15 minutes to stand up; the agent is the dispatcher
What you don’t get (be blunt)
- No Xactimate estimate, sketch, or line items
- No XactAnalysis / ClaimsConnect upload
- No BAA — health claims and PHI are out of scope
- Photo stamp is opt-in (
"stamp_photos": trueon photo fields at form setup; gallery picks without EXIF may show date/time only) - Claim numbers and claimant names are not stored on ZenSched
remote_checkinis a last resort and turns GPS proof off for the whole policy
Who this is for (and who it’s not for)
Ideal for:
- Photo-only inspectors and IAs who need owned proof when a TPA disputes the visit
- Shops dispatching 1099s who need geofence enforcement outside Eberl / Pilot / Sedgwick apps
- Overflow, direct TPA, and appraisal inspections that never enter XactAnalysis
- Operators who already talk to Claude, Cursor, or Muse and want a pasted email to become a phone shift
Not a replacement for:
- Xactimate when the product is the estimate
- Eberl360 / Pilot On Demand on assignments from those networks
- A carrier’s assignment and QA system
This is agent-first infrastructure. The operator talks to the agent, and the agent talks to ZenSched.
Get started
- Kit: github.com/zenschedmcp/zensched-claims-inspection-kit
- Docs: zensched.com/docs/quickstart
- MCP:
https://mcp.zensched.com/mcp - Related: Agent-run lawn care · Agent-run pet care · Agent-run home care · Agent-run mobile notary · Agent-run process serving · Agent-run mystery shopping · Agent-run STR turnover · Agent-run tenant inventory · Agent-run vacant-property inspections
Ready to build your own workflow?
Clone the reference kit and connect ZenSched to your AI agent.